The Perfect Media Series has a new home at perfectmediaserver.com. This series remains public here for informational purposes only - for questions or support please visit the new site.
Storage should be boring. Boring is reliable. Reliable means you don't lose data. And that's exactly what the MergerFS + Snapraid combo I first wrote about in 2016 has provided. A solid, boring and reliable way of storing multiple TBs of data with little fuss.
Fundamentally with regard to the Perfect Media Server (PMS) since 2016 I haven't changed all that much. Yes, I've upgraded Debian from 8 to 9, moved to Ubuntu (for ZFS support) and built a Proxmox server to virtualise the whole thing. But the big three core technologies of MergerFS + Snapraid and Docker haven't changed. They just work. I feel confident, with 3.5 years of experience using this stack under my belt, in recommending it to almost anyone as the perfect solution for large, static datasets such a media files.
Recommended reading and install guides can be found here:
You can also find my entire infrastructure deployment automation on Github at IronicBadger/infra. I intend to write follow up posts on how to actually utilise this Ansible code base for those new to the tech.
Media Server meets Homelab
To date these articles have focused exclusively on being the best media server solution. Nothing has changed on that front and the 2017 article will get you up and running from scratch on a bare metal system. Since then, I've started virtualising my PMS, which I get isn't for everyone, but here's why I do it.
As my career has progressed I found that the technologies I'd been learning by building these systems at home opened up new and ever expanding possibilities. This is an aspect of building a solution which I believe many people overlook, self improvement. Yes, a GUI is nice but if you take some time to learn how the system is put together underneath you'll put yourself in a really great position to talk with passion about this subject at your next job interview.
Homelabbing is a whole other discussion really but there is a great subreddit at r/homelab which will make whatever you have feel puny. A Homelab is a safe space to learn, test theories that you are considering implementing at work or study for certifications. I use mine to deploy Openshift clusters, discover how little I really know about networking and test out new containers for Linuxserver.io. Having a powerful system to learn and practice on is flexible and when looked at as an investment in yourself, excellent value for money too.
Cloud computing has come a long way over the last 5 years with the rise of cheap compute from Digitalocean (who kindly sponsors this site), Linode and others, you might be thinking that you could just do "a Homelab in the cloud". For some use cases this is definitely true but for me, I like to dig a little deeper and until you've got full control of the entire network and physical hardware down to the SATA controller level you could be leaving stuff on the table that might be useful to know. Flashing an LSI card to IT mode anyone? Knowing hardware (and its limitations) is useful too.
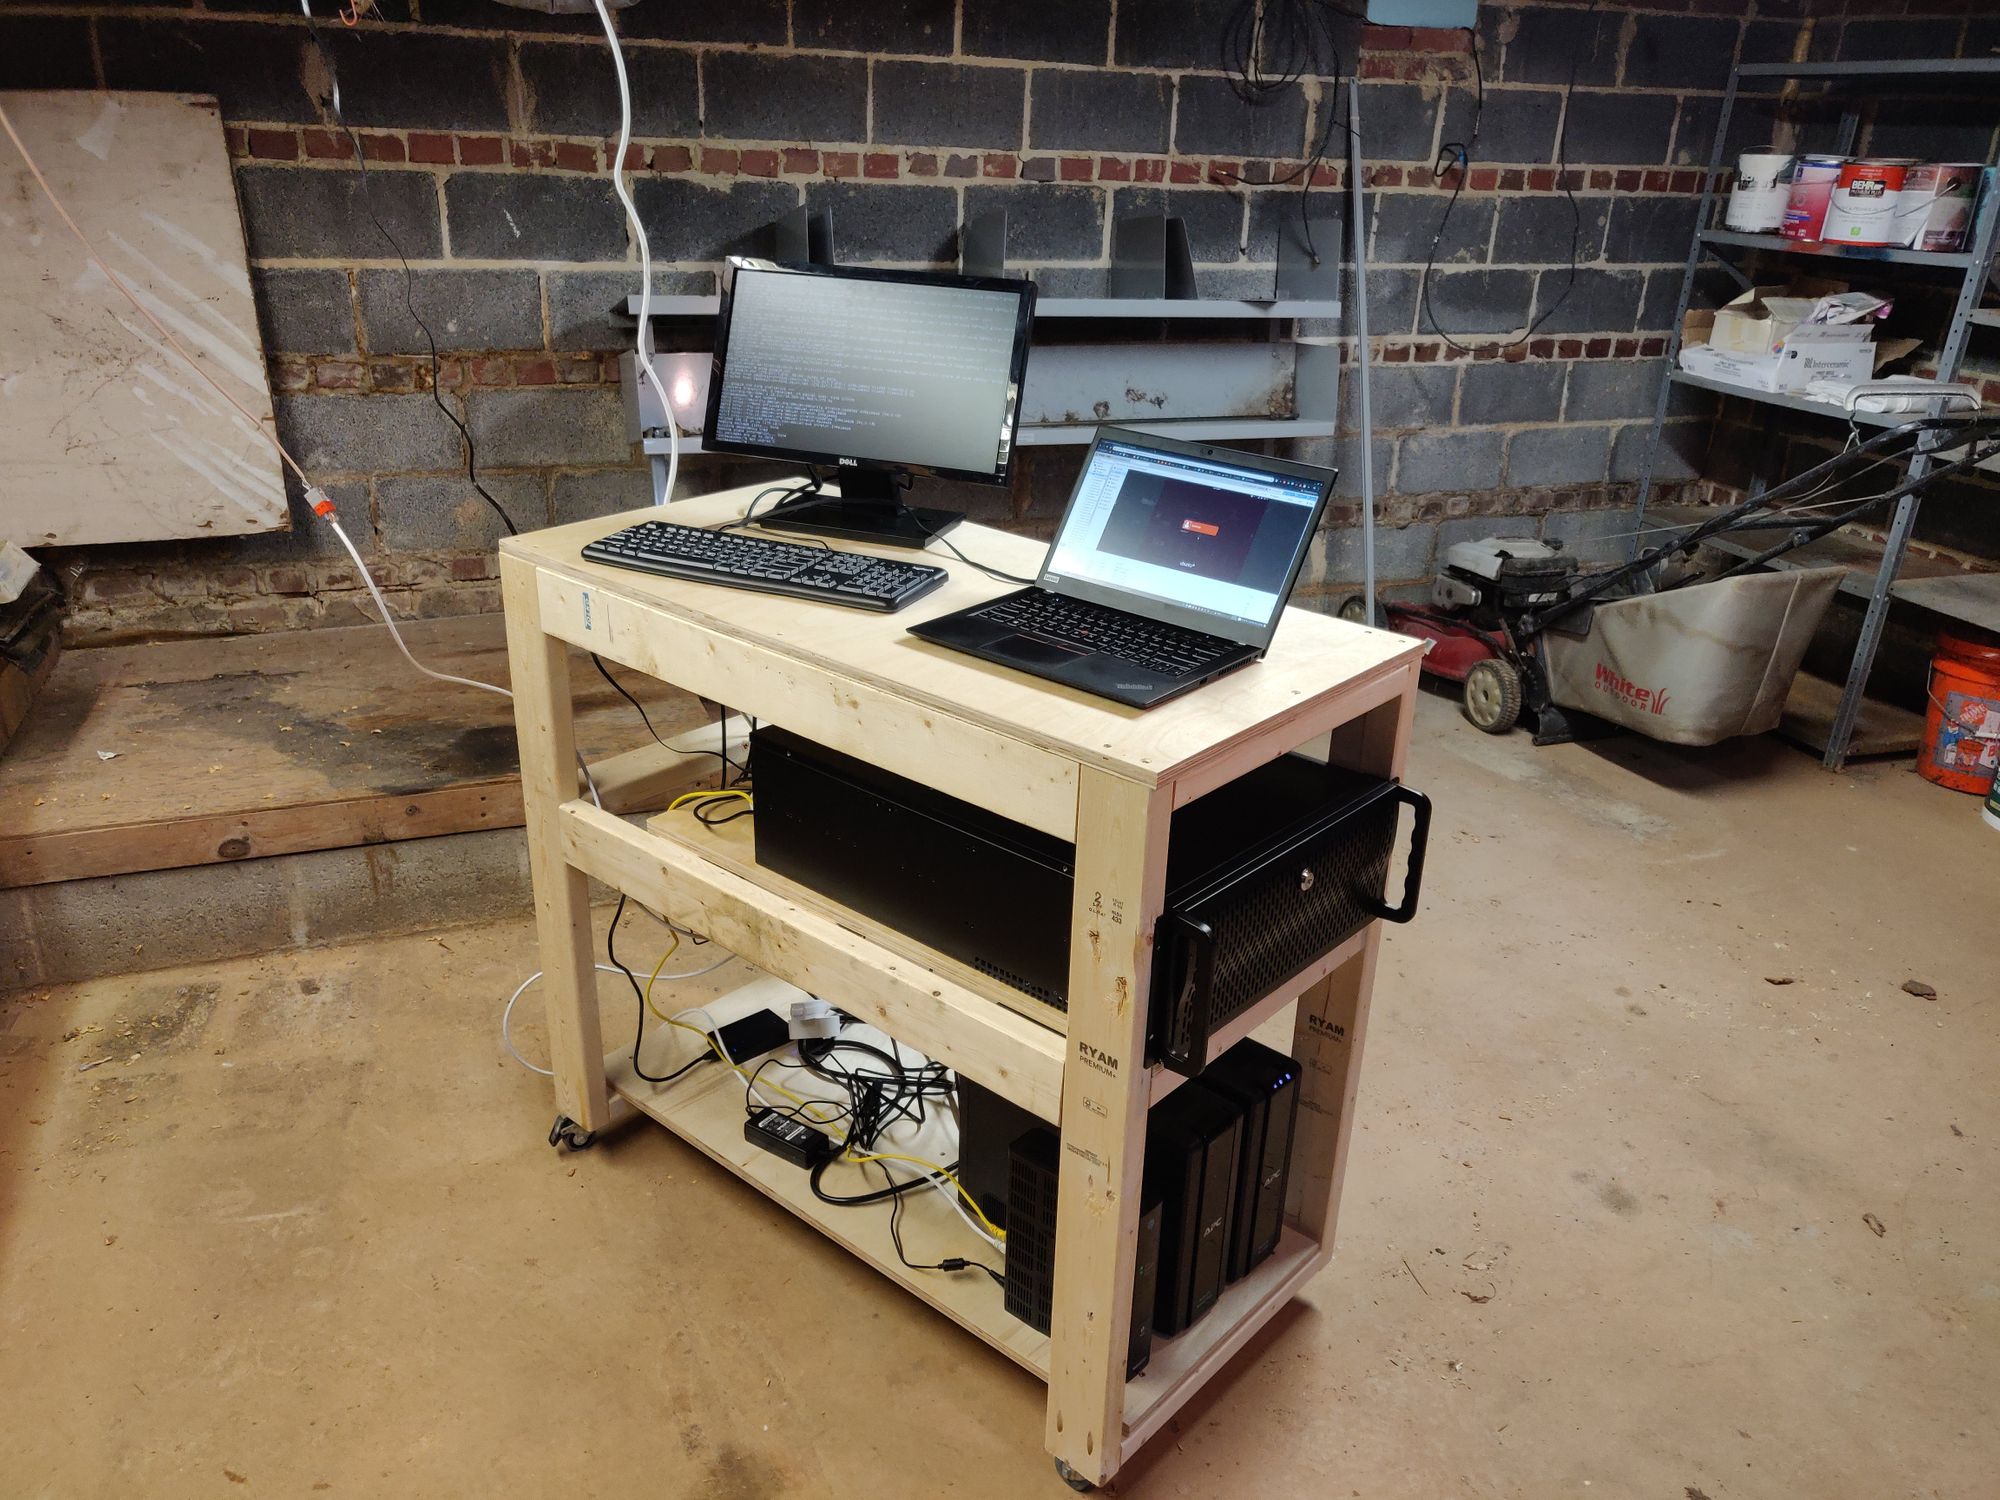
Above is the new build housed in a rack I built in an couple of evenings after work. It ain't the prettiest but it gets the job done. For these reasons I have built a dual-CPU server with 20 cores, 40 threads, 128gb RAM and enough SSDs to run 2 full Openshift clusters at once plus my regular Perfect Media Server duties as well. I wrote about the hardware in a bit more detail here.
As I discuss in that link I flipped between running everything out of bare KVM built into the Linux kernel, VMware ESXi or Proxmox. For now I'm running Proxmox and am quite happy with it especially considering it's free and open source.
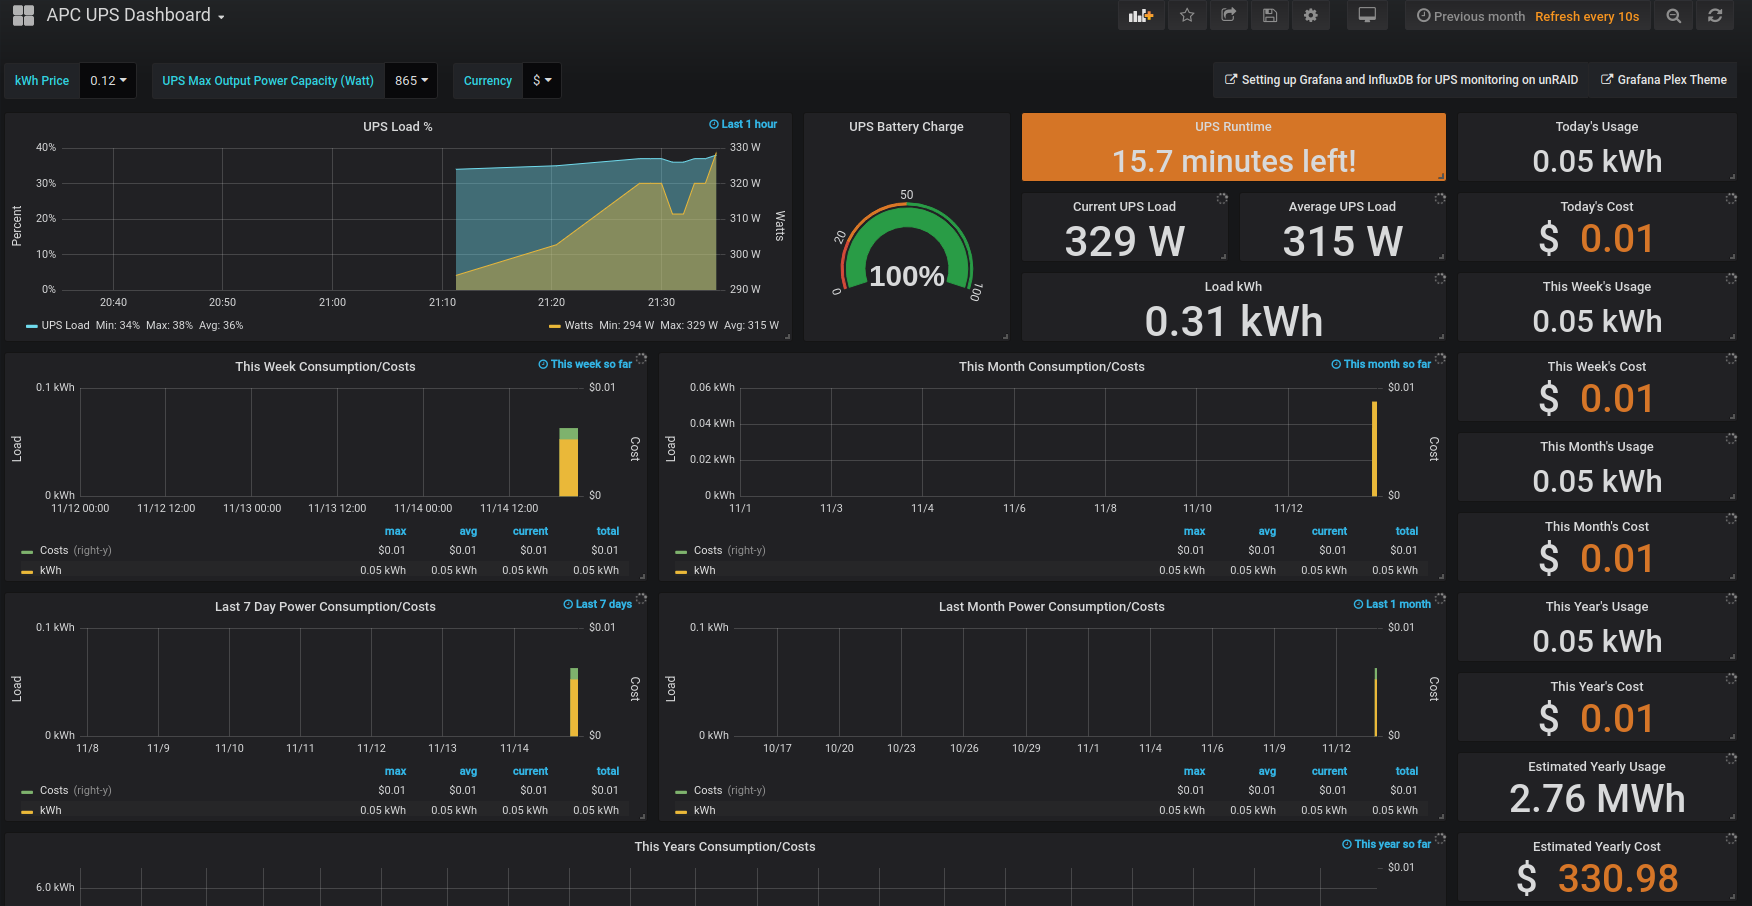
I also added a large UPS at the bottom as Raleigh gets a lot of lightning in the summer months and 30+ min outages seem common (admittedly this is only my first year here). This UPS can run the system for about 90 mins at the average 250w idle it draws. Find out more about UPS and Grafana setup in this post if you want a pretty dashboard like this.
Proxmox
![]()
Proxmox VE is a complete open-source platform for all-inclusive enterprise virtualization that tightly integrates KVM hypervisor and LXC containers, software-defined storage and networking functionality on a single platform, and easily manages high availability clusters and disaster recovery tools with the built-in web management interface.
As you just read Proxmox utilises KVM under the hood which is built into the Linux kernel and is a powerful hypervisor used by millions. KVM, plus its supporting cast qemu and libvirt, are old friends of mine from when I was first getting into Linux to do PCI passthrough. I recently spoke about passthrough on Linux Unplugged episode 308 where you can listen to a 1 hour long "passthrough 101". Proxmox can be installed either as a standalone distribution or as a set of packages on top of an existing Debian install. I prefer the latter.
Simply put PCI passthrough takes a device such a NIC, RAID controller or GPU and "hides it" from the host OS. You are then able to grant a VM raw access to that hardware "passing it through". It's a pretty useful technology to get your head around as it opens a lot of possibilities on a single system that used to require multiple boxes.
Thanks to passthrough I'm able to give some of my VMs direct hardware access. For example, I can run pfsense, PMS (I call mine cartman) and much more in a VM. I put a 4 port Intel Gigabit NIC PCIe card into the server, passed it through and pfsense has direct access to it meaning I can consolidate hardware, reduce energy usage and experiment much more easily. Running anything out of a VM reduces risk of updates and other issues thanks to things like snapshotting.
For the longest time I avoided Proxmox because I thought you had to pay for it because of this message.

However, I was completely wrong with that assumption. Proxmox is free unless you'd like to pay for additional support. It's a totally wonderful piece of software that is constantly adding new features and is quite stable[1]. That said, I didn't particularly enjoy clicking past that box every single time I loaded up the web interface. Therefore I wrote a small Ansible role to remove the automatic 'please subscribe' nag prompt.
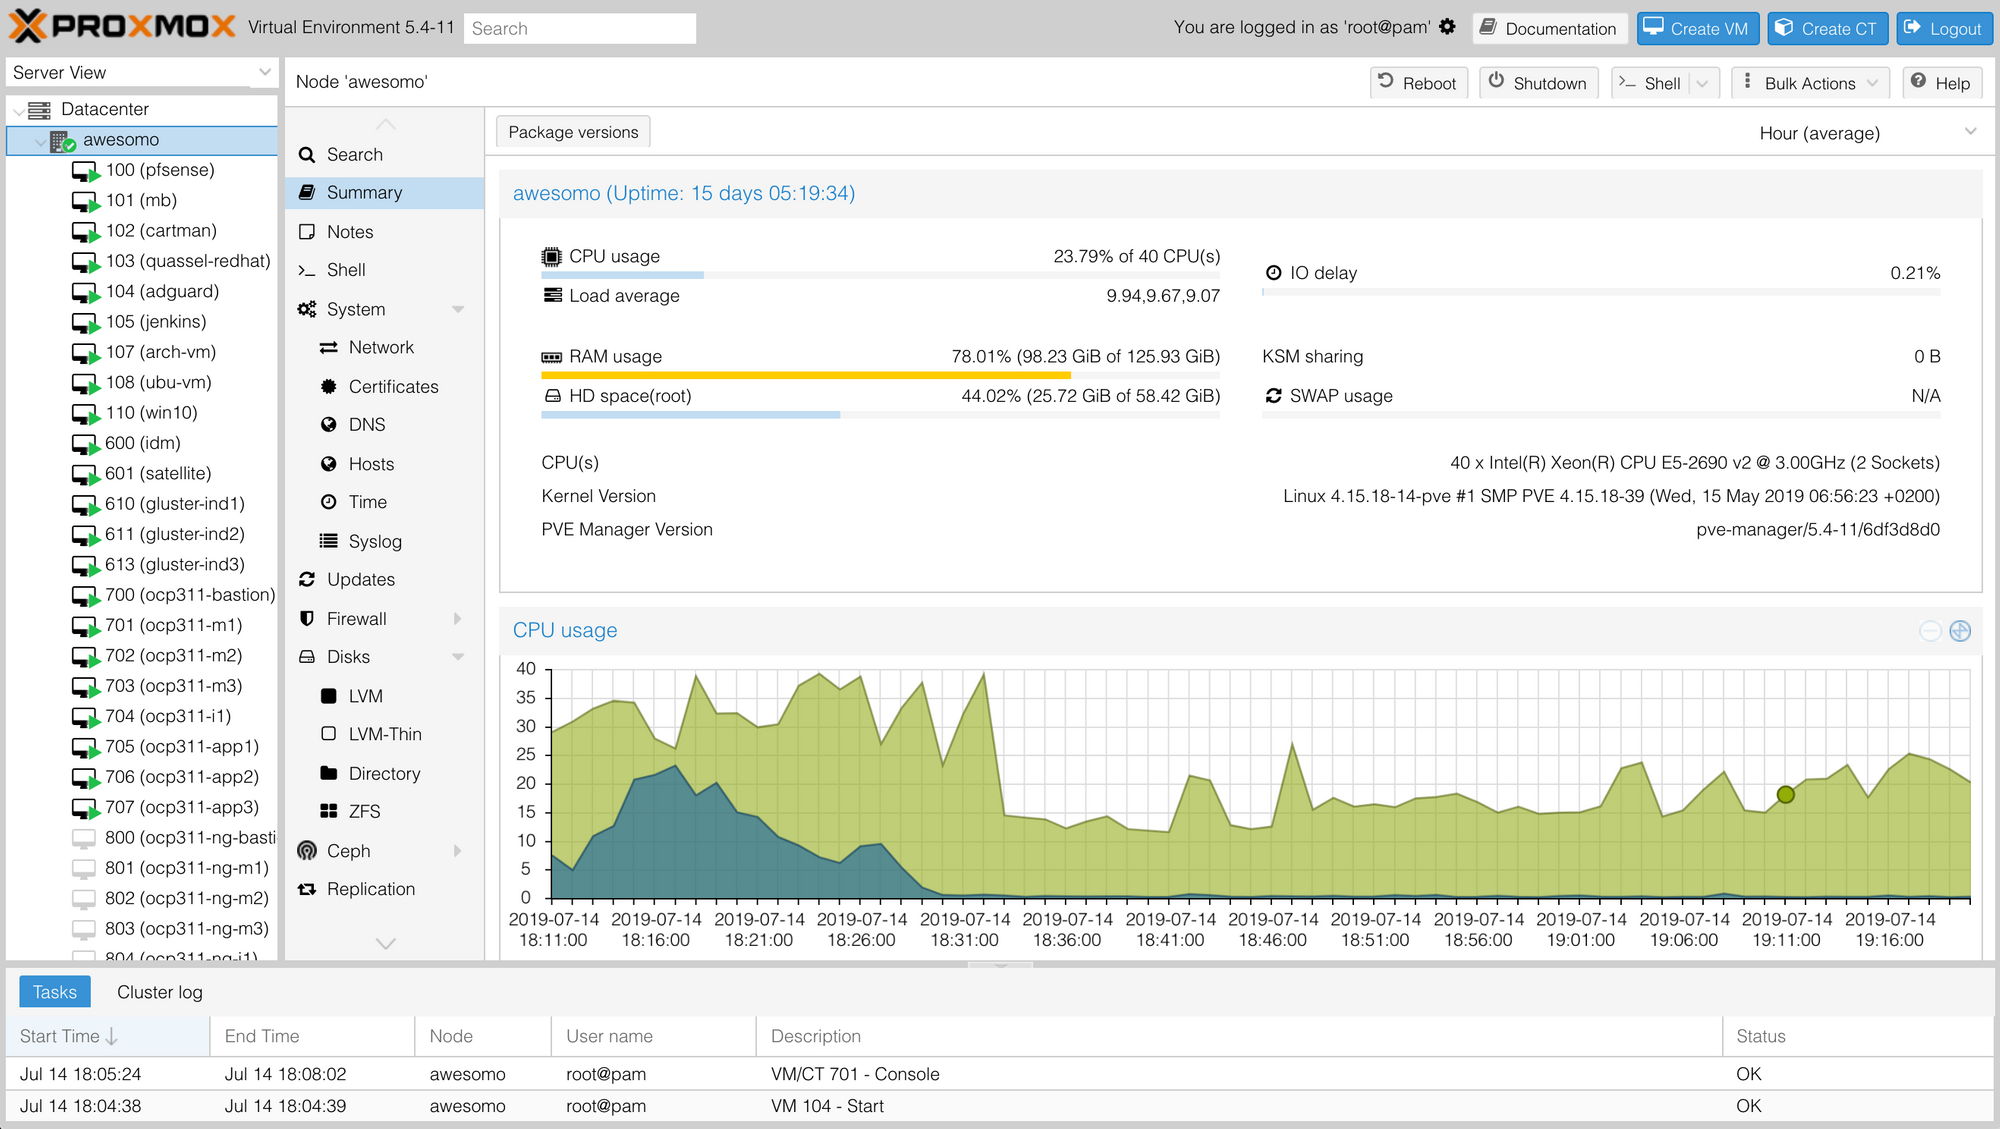
Above is a screenshot of the Proxmox 5 web interface. You can easily create VMs, snapshot them, clone them and much more from here. If you so desire you can interact with Proxmox on the CLI using the qm tool and for automation lovers such as myself Ansible support is constantly improving.
[1] - I recently had an issue when upgrading my kernel that would cause random freezes - to date this has been a one-time thing but once might be once too many for my long term taste, we'll see.
The Software Stack
Ok, I know some of you are coming at this fresh so here's a quick TL;DR of each major component. If you're wondering about each component please take a look at the 2016 and 2017 iterations of the Perfect Media Server linked at the start.
-
Linux
-
Hypervisor - Proxmox
-
Base OS option 1 - Debian
-
Base OS option 2 - Ubuntu
-
SnapRAID - for JBOD + parity
-
MergerFS - for a highly flexible filesystem which supports all sorts of amazing features
-
Docker - sandboxed applications
OK. He's listed two Base OS options. Why? ZFS. That's why.
Previously I've discounted ZFS as being too complex or too expensive or not flexible enough for most people most of the time. I stand by those comments but hear me out.
Debian vs Ubuntu
In April I went to Linux Fest North West and decided I'd like to investigate ZFS a bit further after attending a couple of talks by Jim Salter and Allan Jude. I wrote up my experiences here for you.
In order to make my life simpler and because Ubuntu ships ZFS natively I decided to swap out Debian 9 for Ubuntu 18.04 LTS. It simply boils down to if you want ZFS support use Ubuntu and if not, use Debian. Ubuntu is based on Debian so I found 95% of my automation worked the same on Ubuntu as it did on Debian anyway and minimal refactoring was required. In fact, my preference would be Debian if I didn't have to go through a lengthy process to get it installed. Even if I automated this installation process in Ansible I'd still be reliant on DKMS kernel module recompilation and "that's a gonna be no from me dog".

Putting aside the licensing drama I am happy enough with the state of ZFS on Linux in relation to the FOSS goals of this system. The project seems healthy and there are monumental efforts to bring the codebase in sync with other platforms on going.
ZFS and MergerFS
So how does ZFS fit into the PMS system? Really well actually. I have sacrificed two drives in a mirrored configuration to ZFS and mounted them at /mnt/tank. Under the tank mountpoint I have over a dozen datasets. Datasets are cool and allow snapshots which I have automated to be taken every day. As ZFS is a CoW (Copy on Write) filesystem these snapshots use very little disk space (kilobytes) and track only the delta since the last snapshot was taken. They are very efficient and also allow me to rollback any dataset to a given point in time and then mount it under a different mountpoint to perform a manual diff very easily.
I now also use ZFS for all container appdata folders. Snapshots of the configuration of these apps and their associated databases etc. makes testing config changes so much less risky than before. If I screw something up I can rollback in one command like nothing ever happened. It's really great.
Fitting this into my MergerFS 'system' took a bit of thought but after a bit of experimentation I settled on the following layout.
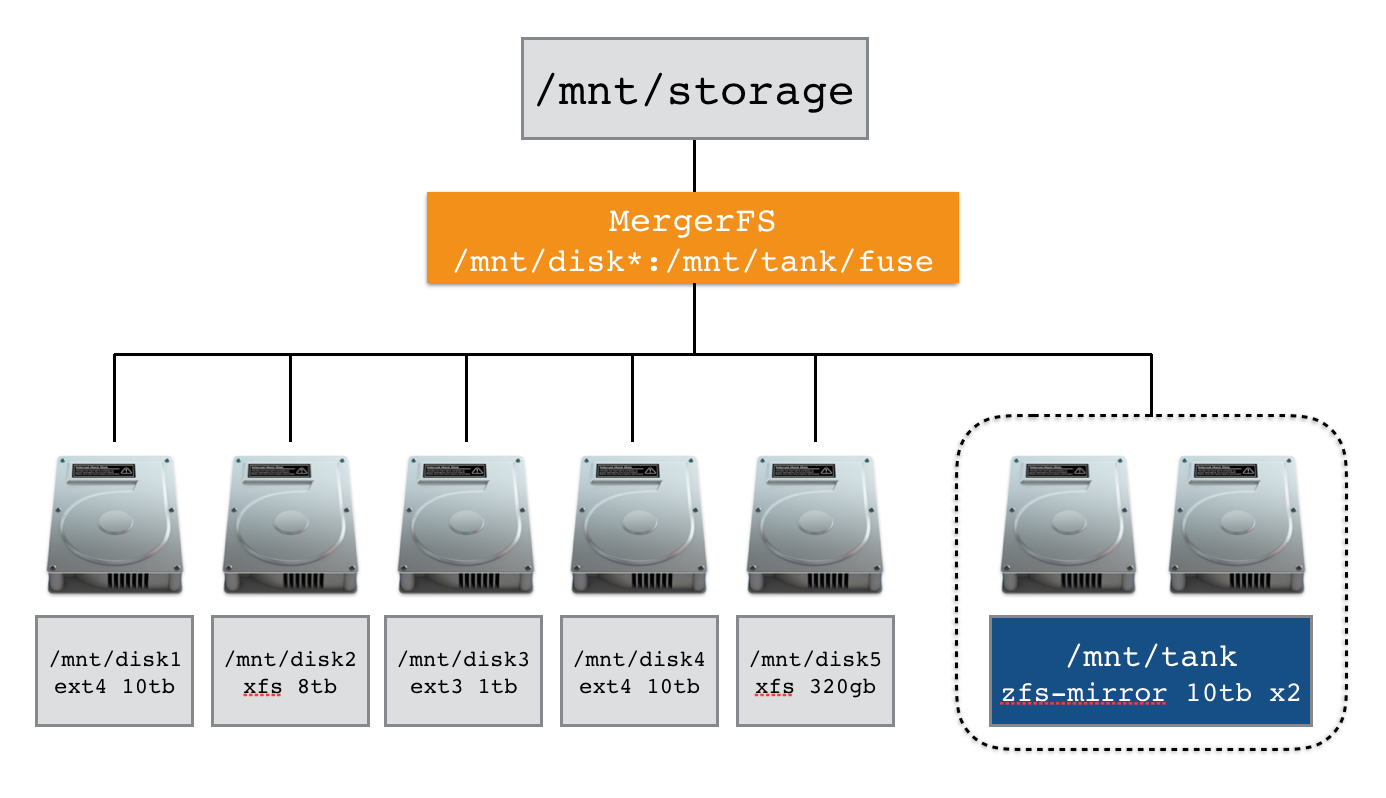
Here is the /etc/fstab entry that makes this possible.
/mnt/disk*:/mnt/tank/fuse /mnt/storage fuse.mergerfs defaults,allow_other,direct_io,use_ino,hard_remove,minfreespace=250G,fsname=mergerfs 0 0Using the : as a delimiter we can string together multiple mountpoints as well as globbing them together using a * wildcard. Putting all data I want MergerFS to see under /mnt/tank/fuse allows me to use other parts of /mnt/tank for appdata and backups without making the automatically available via MergerFS. ZFS supports automatic NFS and SMB sharing if that's your thing too. I have samba configured to share /mnt/storage, my main MergerFS mountpoint.
Here's a typical example. I have my photo library under /mnt/tank/fuse/photos and some drone videos under /mnt/disk1/drone/. I could access the files directly at the above paths if I wanted. But with MergerFS I end up with two folders transparently merged together and presented to me as /mnt/storage/drone and /mnt/storage/photos. In this way I don't care which disk my data sits on anymore. Also imagine if my drone footage folder exceeded the size of a single drive and spilled over onto /mnt/disk2/drone. In this scenario I end up with one folder at /mnt/storage/drone that spans two phyiscal drives!
MergerFS is so flexible. You can use mismatched drive sizes, different file systems and it will even support hot swapping (such as a portable USB device for example). I feel like I've taken it to an extreme by putting ZFS under a MergerFS mount point but it works very nicely. MergerFS actually doesn't care that it's ZFS, and that's the real magic at work here.
By ensuring you are using the correct policy with MergerFS you can write directly your ZFS drive via the FUSE layer and guarantee your data ends up where you wanted it. The default policy epmfs (existing path most free space) should suffice.
Hardware
That's enough talk about software, what about the tin?
A new build
I emigrated from the UK to the USA in August last year and as such it was time for a hardware reshuffle. I sold a bunch of older stuff in England and am still working through replacing it over here. But I came across this site serverbuilds.net who had just posted an anniversary build.
There's a ton of resources on serverbuilds but you should definitely take a few minutes to browse the excellentCPU spreadsheet before buying a new CPU. You'll probably think twice about that Sandy Bridge chip now (in a good way).
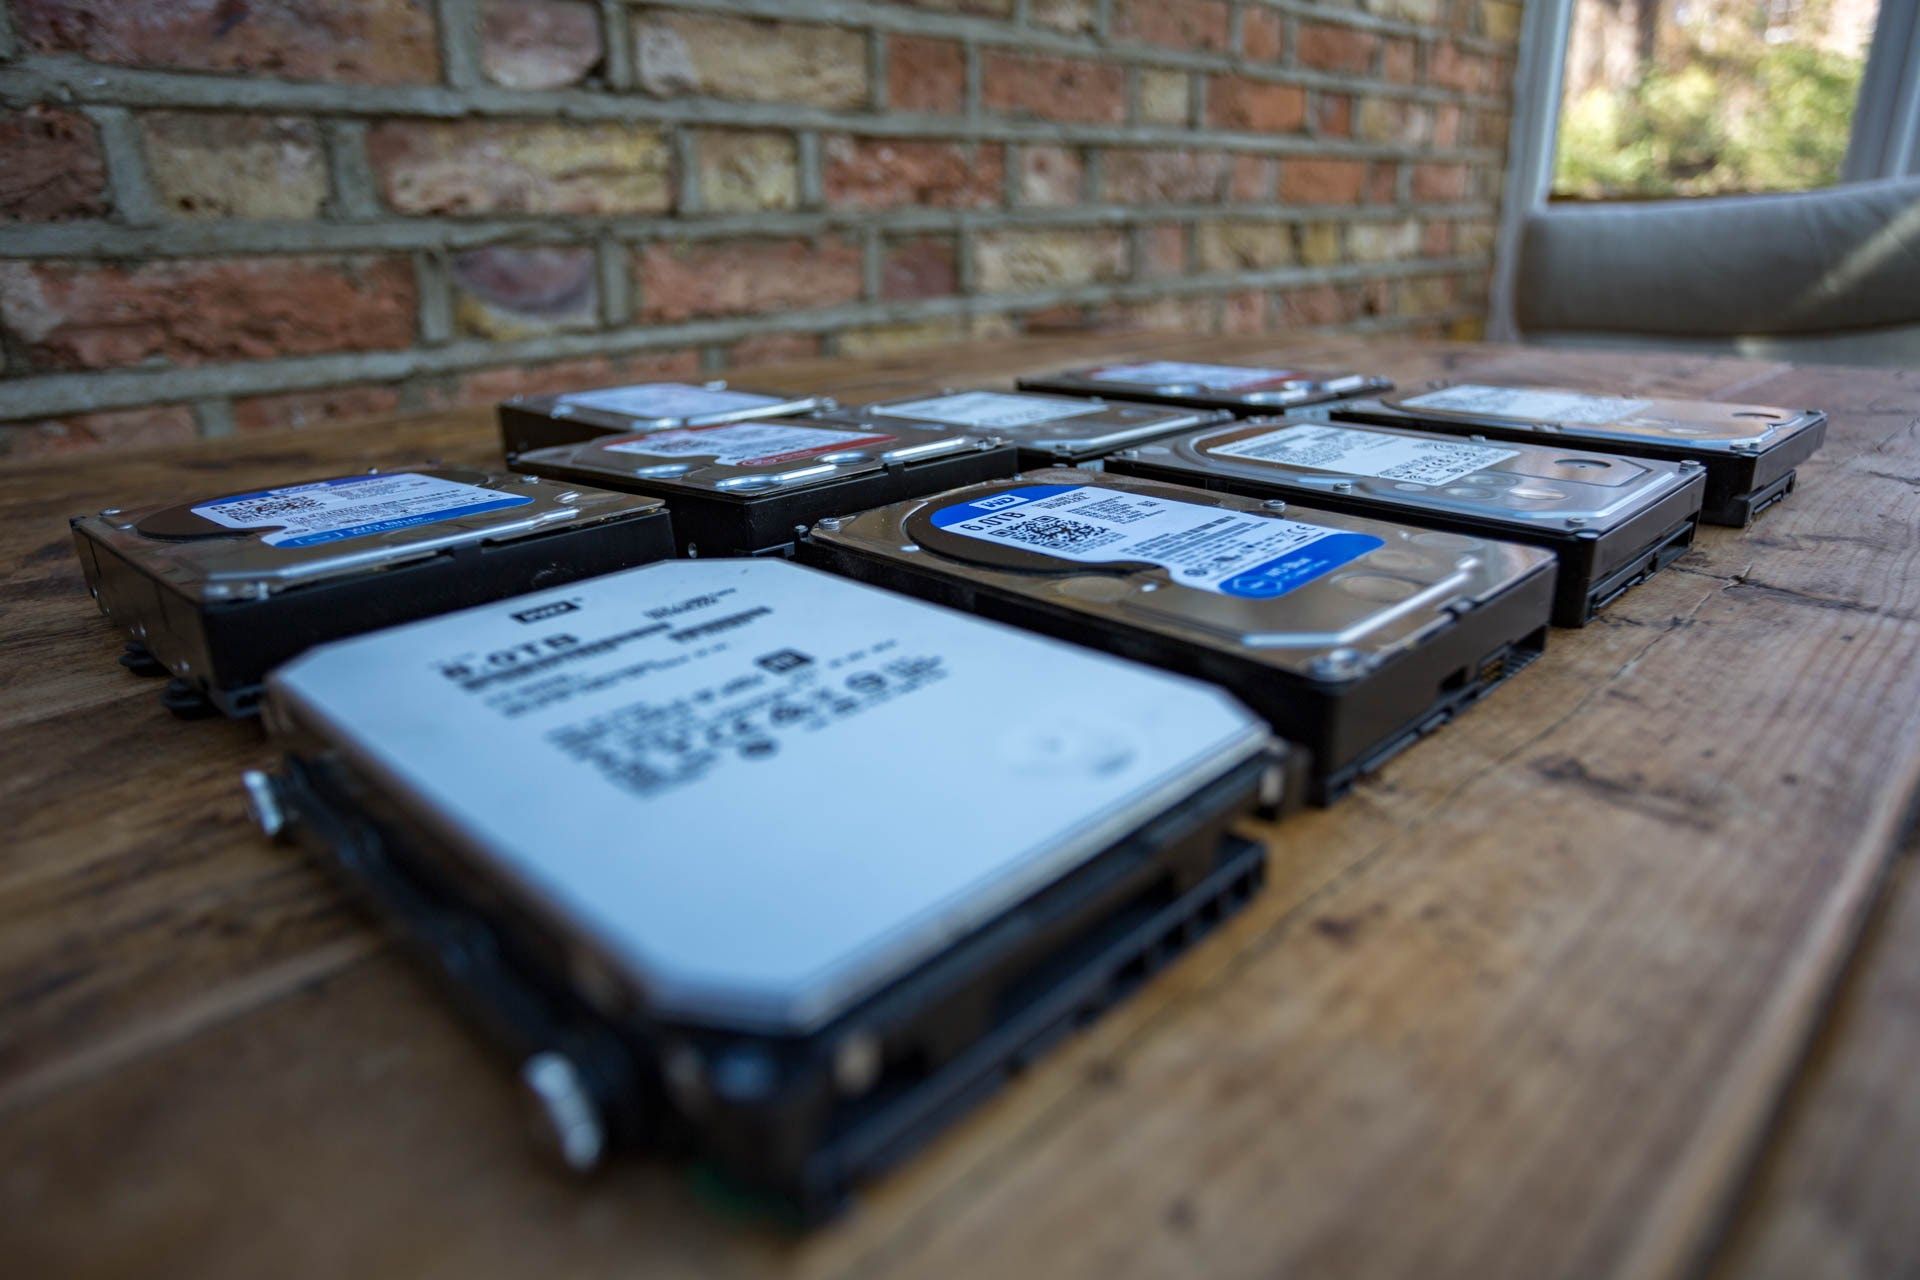
Hard Drives
Cloud storage is getting cheaper, but not cheap enough for my taste and besides - when the zombie apocalypse comes at least I'll be able to find that old Mandriva ISO from 2007. Love 'em or hate 'em, we need hard drives. I have a lot of photographs and drone footage to store so SSDs are out of the question. Seagate did just release a 3.84TB SSD featured on Linus Tech Tips but they're $500+ each versus a shucked 10TB drive from Best Buy at $170 each, it's no contest for now.
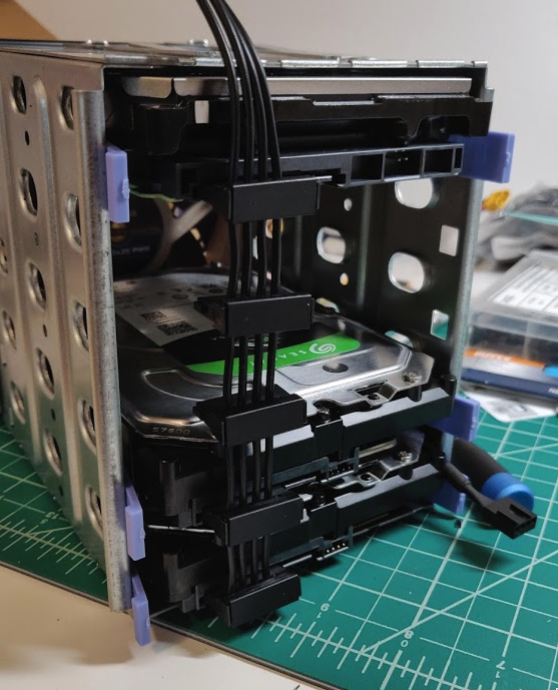
I wrote about my new hard drive rituals if you're interested in how I 'burn-in' new drives before comitting data.
There are many requirements to take into consideration when purchasing drives:
- Capacity
- Performance required
- Noise
- Warranty
- Price
There are probably more factors to consider than these but I have found that choices are often made for you when introducing 3 or 4 requirements. Hard drives are expensive and if building a capacious system can easily consume 75% or more of your budget. It is therefore likely that price will dictate the capacity you select.
HDD Purchase Methodology
It is a fact of life that some mechanical hard drives are created more equal than others. The manufacturing tolerances involved are microscopic and transportation is a high risk time for any drive. For these reasons I try to follow some rules when purchasing drive(s). They are:
- Only ever purchase one drive per retailer per 6 months
- Distribute makes, models and manufacturers where possible
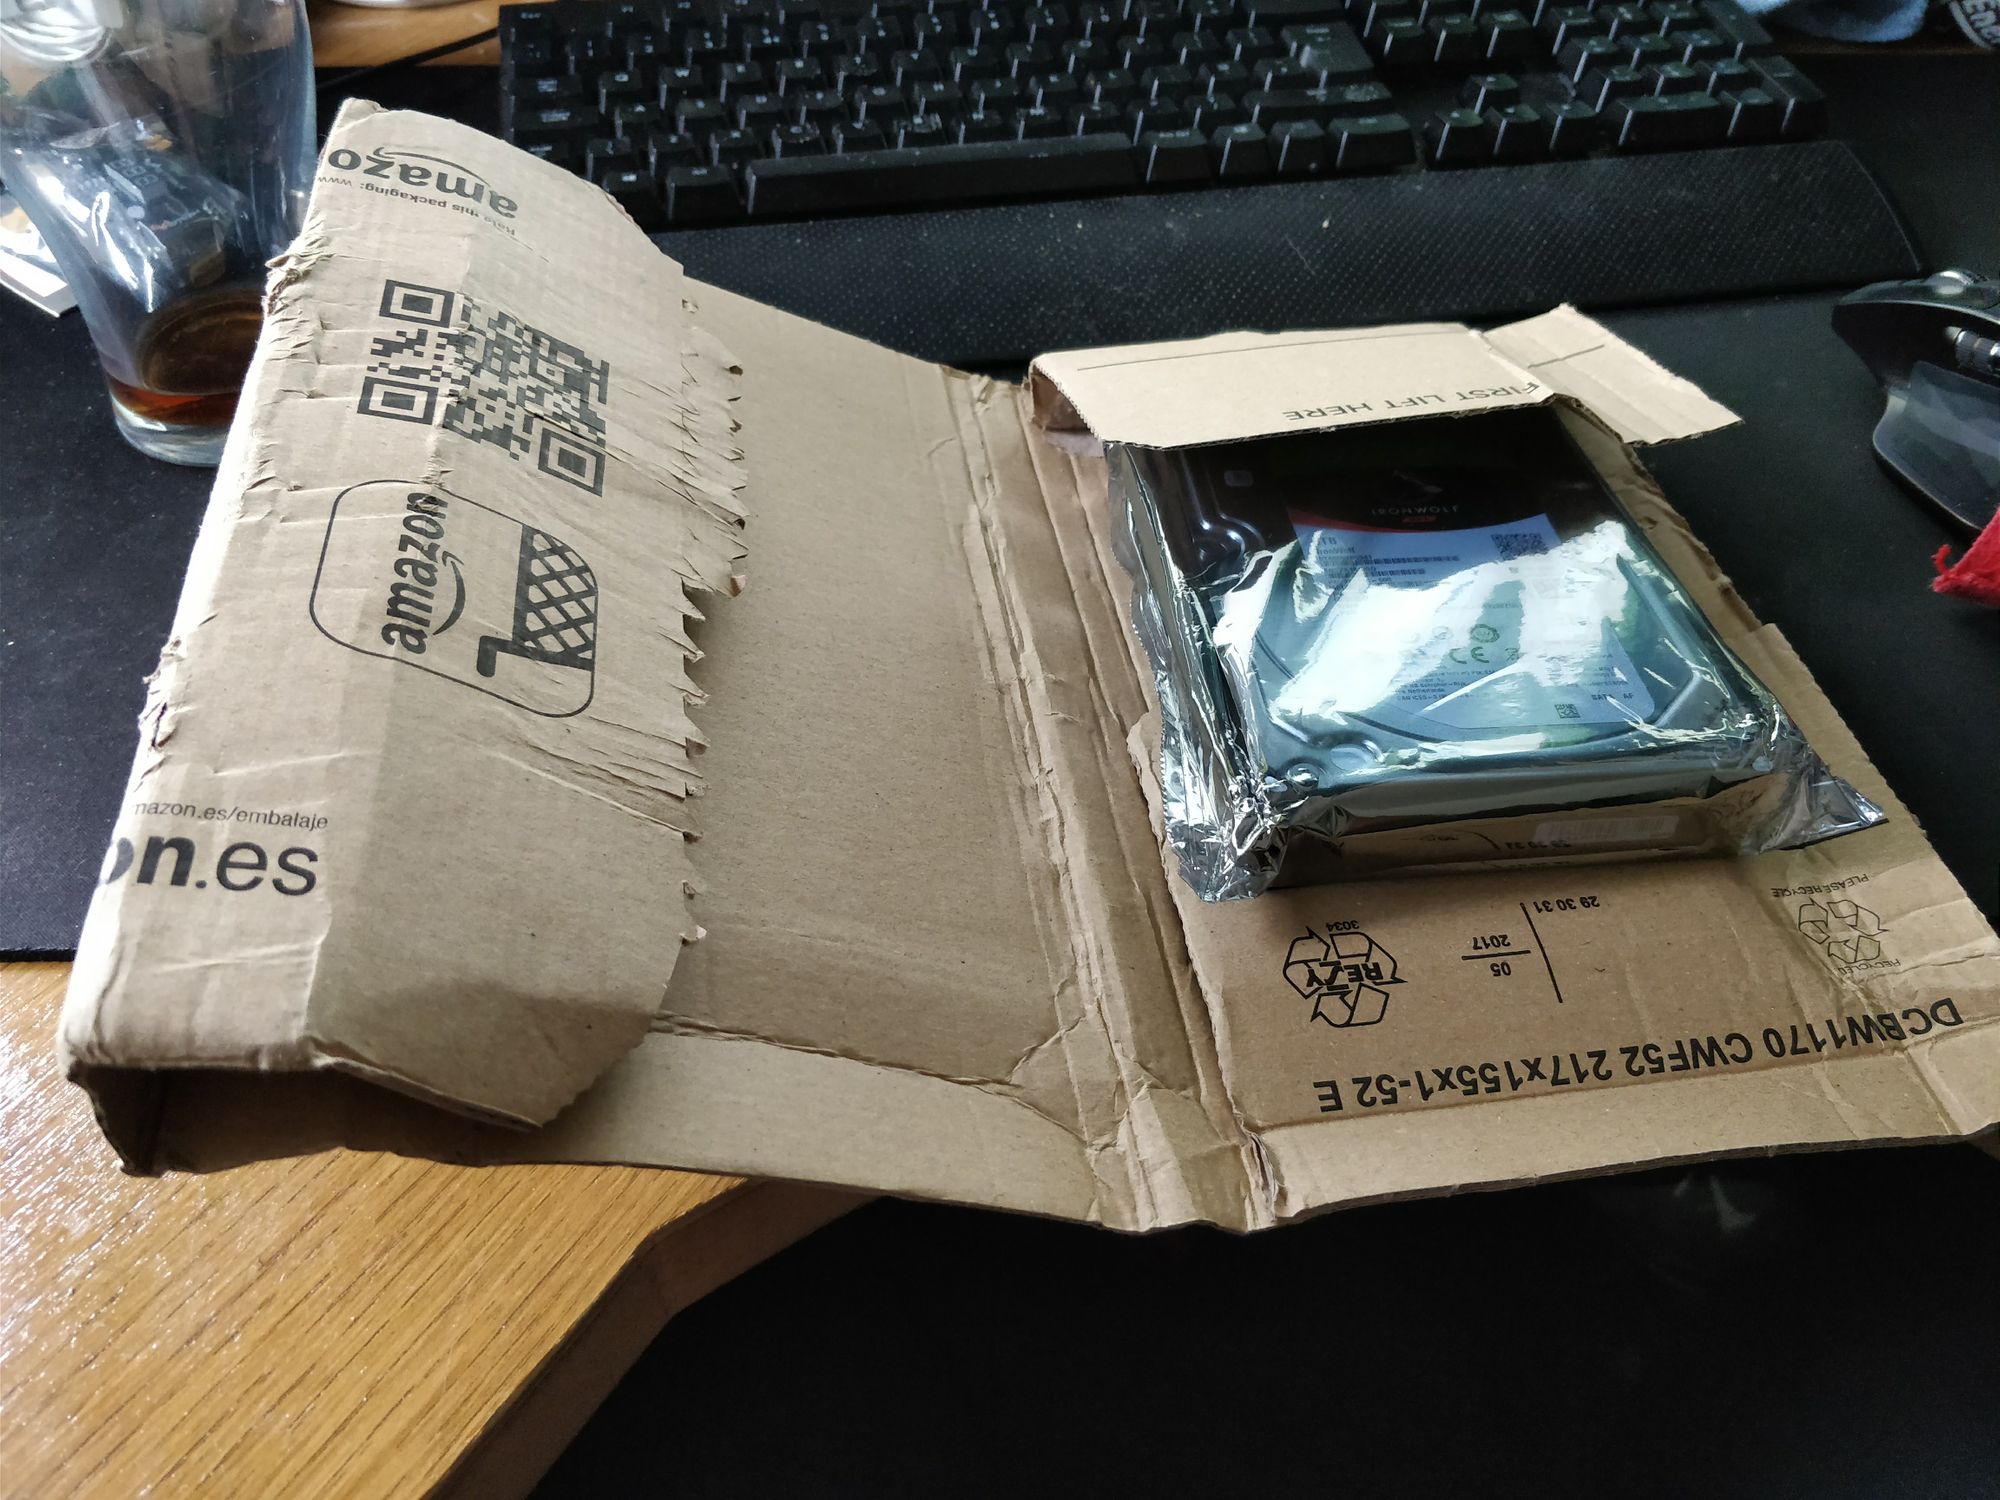
- Never buy drives from Amazon - they come wrapped in tracing paper
Let's delve into these in a bit more detail.
Rule #1
Rule #1 is designed to split your purchase across HDD manufacturing batches.
As with anything mass produced, hard drives are made in batches and some have (much) higher failure rates than others. By purchasing from multiple retailers you will be paying a little extra for shipping but the potential hassle saved in the long run of multiple drives from the same batch suffering a catastrophic failure at the same time will more than make up for a few $$$ in the long run.
Several years ago Seagate suffered a high failure rate on 1.5TB drives. Just imagine if you had purchased several of these drives and placed them in your box. The drives are even more likely to fail at the same time because they're exposed to the same (or very similar) environmental conditions, vibration and workloads as each other. So if there's a bug and you find it, you may well find it on all your drives within a few days or weeks of each other. With drive capacities heading northward of 10TB, that's a LOT of data to go poof.
Rule #2
Rule #2 suggests splitting makes, models and manufacturers where possible.
For many of the same reasons just discussed it may be prudent over the long term to do this. You never know what cost cutting program a particular manufacturer is performing right now and nor will you until it's too late. You just don't know whether a new model from HGST is going to have a better lifespan than a WD model or the equivalent Seagate. We can speculate, and the internet does love to do so. To coin a phrase from the stock market, past performance is no indicator of future reliability and therefore brand loyalty should not enter your purchasing decisions.
Many people in the r/datahoarder community and other related communities have suffered at the hands of Seagate over the years (myself included). This was especially true around the time of the Thailand floods a few years ago when rampant cost cutting led to poor QC and ultimately a poor product. For this reason you'll still see many people absolutely swear blind they'll never buy a Seagate ever again. I was one of them for a while until Seagate released their 8TB SMR (shingled) drives for the same price as WD wanted for a 6TB Red. When it's only one drive in a system it's a pretty decent way to test the waters. In the 18 months since I purchased that Seagate SMR 8TB drive, it's been one of the best performers in my system with low temperatures when operating and great performance for media. Time will tell but so far, so good.
Rule #3
Rule #3 is obvious. Don't buy drives from Amazon. I have twice due to competitive prices and low shipping ordered drives from Amazon, ignoring my own advice. Alas, on both occasions the drives were wrapped in a single layer of cardboard with no padding and on one occasion the drive had a visible dent in the casing. I never even bothered trying to power that one up. It was returned immediately. Save yourself the hassle and don't buy drives from Amazon.
These rules happen to tie in nicely (surprise!) with some of my other overall thoughts on putting together the perfect media server and a topic I covered in the 2016 article. Namely, home users (the primary target for this series) probably don't want to have to buy 3+ drives at a time - it's just too much money to spend in one go! The ability to organically grow a system as your content collection, drone footage or linux ISO stash does is an absolutely core tenet and a key reason why I don't think any solution which requires adding more than one drive at once (going full ZFS, for example) is a suitable solution for most people, most of the time. By growing the system organically you not only put less pressure on your budget up front but you also potentially increase the overall reliability of the system thanks to Rule #1 and Rule #2.
If you needed another reason; the longer you wait, the more TBs you'll get for the same cash. 2 years ago I tried to 'standardise' on 6TB drives. The time came 6 months ago when I wanted to add another drive to my system and for the same money per drive I could now furnish my system with an 8TB model. Backblaze, purveyors of the excellent "Annual failure rate" series, have this interesting take on cost per gigabyte.
The general takeaway from this is that you should never buy a hard drive because in 6 months you'll be able to get significantly more for your money. Of course, this is a reality of any tech. At some point you've just got to bite the bullet and press the purchase button - but you get my point, I hope.
Shucking an external hard drive to save $$$
I'll keep this section brief as there is a load of information readily available over at the r/datahoarder subreddit. Suffice to say that Western Digital frequently offer 8TB drives for under $150 either via Amazon or Best Buy. You ignore Rule #3 because these are retail drives and ship with appropriate packaging around the all important hard drive.
You might find yourself needing to either modify your power cables to get around the 3.3v detection fix on WD drives. WD obviously want you paying top dollar for your drives and so have enabled in the firmware a 3.3v detection dead mans switch. The fix is easy. Either A) apply kapton tape to the pins - detailed here or B) cut the 3.3v wire on your sata connectors. Not all PSUs are affected and it's really not a big deal. See below, I made some custom power cables which omit the 3.3v rail altogether - problem solved.
I have purchased 2 WD easy stores from Best Buy and 2 8TB Seagate SMR shingled drives from Amazon so far this year and they perform identically to their more expensive brethren. You have nothing to fear here except the lack of warranty - but for the price I'll take it.
Wrap up
Thanks for reading the 2019 edition of The Perfect Media Server. I'm working on a new and exciting project in this space which I'll be able to share with you in about a month.
Until then you can find me on Twitter @IronicBadger or on the Linuxserver discord server. I'll try to remember to check the comments below but if your question goes unanswered for too long try me on Twitter.